Tcl/Tk Basics you need to be aware of.
What is Tcl/Tk?
Tcl, the "Tool Command Language" is a very high level computer language that is used to glue together other programs and make them work together in useful ways. The Tk extension to Tcl allows you to program in a windowed environment such as Windows 95/98/NT, Macintosh or the Unix Xwindow system and control events such as mouse clicks and window events etc. Tcl is cross platform portable. A pure Tcl/Tk program that does not call any platform specific commands or use special extensions will run on any supported platform without modification. Tk has many pre-programmed "widgets" such as buttons, message boxes, list boxes, a Canvas for drawing, graphing and animating, scrollbars, and a powerful programmable text widget and more. Widgets have preprogrammed behaviors that you can control and modify using Tcl. You can glue together these widgets in useful ways using Tcl to create a program that will do something useful and have a GUI "point and click" interface.

The algorithm designer program uses a notebook widget written in Tcl/Tk by Dr. Richard Hipp and modified by us. Each page of the notebook has a Tk "Canvas" widget displayed in it. The canvas widget is essentially that - a blank canvas onto which you can place various "objects" that can then be programmed to do a variety of things with user interaction - primarily mouse events - clicks, drags, mouse moving into an area or leaving an area etc. The canvas has an x,y coordinate mapping scheme that allows you to program movement and track positions of objects. Tcl also keeps track of all the properties of objects on the canvas and you can place various attributes called "tags" on groups of objects that can then be acted on together. Each page of the notebook had an "Edit Algorthm" which brings up a palette of 9 possible objects you can use to populate the algorithm.
For the purposes of the algorithm the main thing you need to know is that buttons that you can click on have three major properties you can change for the algorithm - the text that appears on the button, the command that happens when you click on the button, and the coordinates (the x,y position) on the canvas. Messages - the boxes where the questions are asked - have no command property but they do have a text property and coordinates like buttons. They also have an aspect (ratio of width to height) property, background color and foreground color properties, a relief (flat, raised, grooved, sunken) property and a borderwidth property. These can all be changed to make your decisions and decision path in the algorithm graphically visible.
How to use the Editor functions.
You can't make permanent changes to the algorithm from inside the web browser plugin. This is due to certain limitations placed on the Tcl/Tk interpreter running in the browser that have to do with security and limiting the chances of a Tcl program being used in a malicious way as a virus. You will have to download the programs notebook_wizard.tcl, notebook_template.tcl, notebook_template2.tcl and notebook_template3.tcl and save them on your hard disk, all in the same directory. Use the shift key when you click on the links in Netscape or if you have the Tcl plugin, it will try to run them as tclets inside the plugin rather than download and save the files. Next you will need the Tcl/Tk stand alone interpreter that you can get from the scriptics website or the scriptics FTP site. Get the version for your operating system and install as per instructions. We have tested it using Tcl/Tk 8.0, 8.1 and 8.2 on Linux and 8.3 on Windows. The Windows version has an install shield type installation process. The stand alone Tcl/Tk interpreter will allow all the features of Tcl/Tk. The plug-in only allows limited features due to security considerations. You need the full featured version to enable the ability to save the changes you make in the program file on your hard disk.
On Windows, start a MSDOS window and cd to the directory where you saved the files. Type "wishXX notebook_wizard.tcl" and press RETURN. (XX is for the version no. you have - 80 82 or 83 of the tclsh shell interpreter. On Unix or Linux, enter wishX.X notebook_wizard.tcl , where XX is the version of the Tk interpreter on your system. A small GUI should will appear.
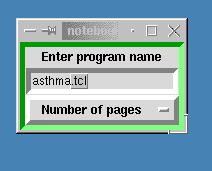
Enter the name of the program you will be creating such as asthma.tcl in the entry box. Then click the pulldown menu button to select the number of pages. Then a menu will come up with some entry boxes into which you can type the titles of the tabs on your notebook pages. . When you are finished, a program file called asthma.tcl (or whatever you named it) will be generated and the notebook_wizard.tcl will exit and launch your new notebook algorithm program. If you want to restart in the future you can type wishXX asthma.tcl (or whatever you named it).
Creating and Moving Objects on the Canvas
In the upper right hand corner of the canvas on each page, you will see a button that says "Edit Algorithm" with a small yellow pointer and a green hand above it.

The yellow pointer and green hand can be dragged around by clicking on the them with the RIGHT mouse button, holding it down as you move the mouse around. The yellow pointer is used as a MARKER to select which object you want to edit or move.
You will see the object's name and the "ID" in the format that it is understood by Tcl/Tk interpreter and the canvas widget, respectively, in yellow in the upper middle part of the canvas. The green hand is used to mark the position on the canvas where you want to move the object you selected with the yellow pointer.

You will see the coordinates the green hand is located at in red just below the place where the name of the object is displayed. To move the object marked by the yellow pointer, click the LEFT mouse button and the marked object will move to the position of the green hand. If you continue to hold down the RIGHT button, you can drag the green hand to another position and click the LEFT button again to move the object to another position. The green hand will then jump back to it's docking station near the upper right corner of the canvas.
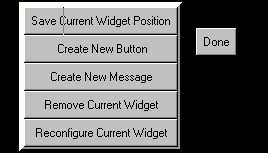
The changes you make to the position of a button or message can be saved into the program file so they become permanent by pressing the "Save Current Widget Postion" button from the editing palatte. They aren't saved permanently until you do this although they will remain during the current session until you close the program.
Creating New Buttons and Messages
To create a new button or message, click the "Edit Algorithm" button and then the "Create New Button" or "Create New Message" button. There is also a choice for a special button that activates a streaming multimedia presentation. There are other special button choices that has have special command to cause a diaplay to pop up with slider widgets wich are very handy for entering the vital signs, blood gas and peak flow measurements. These can be popped up or hidden at will. There is another special button that will allow capturing the progress note you generate to be submitted to our database. Another choice is to place a gif image in the background on the canvas. We have used this as a template for laying out our interactive widgets on a diagram done with Visio. The final object is a CheckBoxList which is a frame you can populate with checkboxes associated with questions. When the user checks these statements will be added or removed from the progress notes.

You will then see a dialog box appear with a ivory colored background and some entry boxes to allow you to enter the new object's properties. The button and message dialogs are similar except the new button dialog has an entry for a command for the button to perform when it is clicked and height and width properties.

The new message dialog has an entry for an aspect which is the ratio of width to height. There is no width or height property and no command for the message type object. The text property is simple - just enter the text you want to appear on the button or the message. If you want the text on a button to have more that one line put a "\n" which is understood by Tcl/Tk as a "new line" and will wrap the text onto the next line. The lines are wrapped by the message widget depending on the aspect you specified - higher numbers give a wider, flatter box and lower numbers give a taller skinnier box. You can use the green hand to locate the x and y coordinates you desire and the program will put these into the coordinates entry box automatically. You can also type them in by hand - be sure to leave a space between the two numbers. The message dialog also has menubuttons for choosing the background color, foreground color (color of the text) and the relief (flat, raised, groove).
The button dialog "command" property is the one that requires a bit of an understanding of how Tcl/Tk works. The process is now pretty much automated by the menus in the dialog boxes. This command property defines a Tcl/Tk command that will be executed when you click on the button. In the case of the algorithms, clicking a button will acutally do several commands in most cases.
- It will usually change the background color, foreground color and relief of the three adjacent message boxes. This is how your current positon in the algorithm is highlighted.
- It will usually cause a statement to be added somewhere in the progress notes. There are four parts of the progress note - subjective, objective, assesment and plan.
- It will often cause a statement that may have been added by another button to be removed from the progress notes if tht statement would be inconsistent with the statement you are inserting.
- There is a preconfigured special button that has the ability to cause windows to appear to enable entry of vital signs, blood gases and Peak flow readings with interactive slider or "scale" widgets.
- There is another type of preconfigured special button for a javascript link to a multimedia presentation.
- Another new choice in the Edit algorithm box is for a file dialog box from which you can choose a gif file to include as a background image to use on the canvas. We have used this technique to place a Visio diagram of the algorithm in the background and then lay out our interactive widgets on top of the Visio.
- Avatars are another item that can be added to the algorithm. They are small images that can have text surrounded by a highlighted balloon similar to a cartoon.
- Buttons can be added for capturing the progress note data and e-mailing it to Dr. Pepper or to be stored in our database.
Button Command Syntax
Most of the information below is not needed to use the design tool as these functions are now automated by menu selections that generate the Tcl code statements automatically but it is still useful to know what is going on.
To cause a button's command to change the configuration of a message box, you need to enter the button's name ( you can find the name by moving the yellow pointer over it ), followed by "config" which is the Tk command to change a property of the button. Then you enter a " - " character, followed by the name of the property to change and the new value of the property like this:.n.f5.1.mes3 config -bg grey -fg grey50 -relief flat
To enter another command for the same button click, type a semicolon which is the Tcl symbol for the end of that particular command (commands also end at the end of a line but since we are putting several commands on one line we have to use the semicolon to separate them). So in the same entry box, we can change two message box's properties like this:
.n.f5.1.mes3 config -bg gray -fg gray50 -relief flat;.n.f5.1.mes4 config -bg red -fg yellow -relief raised
You can then press create and save button and the changes will take effect in the running program and be saved into the program file.
The next thing a button can do is to cause a statement to be added or removed from the progress note. The progress
note is composed of 5 parts: problem, subjective , objective, assesment, and plan . Each part is composed of Tcl
"lists" which is a convenient data structure Tcl uses to store information. The Tcl command to add an item to a list is "lappend", so
to add a statement to the subjective part of the note you can do this:
.n.f5.1.mes3 config -bg gray -fg gray50 -relief flat;lappend subjective {The patient is feeling much better now.};generate
The curly braces are necessary to "group" the words in the statement to be appended to the list so they can be treated as
one item in the list. The generate command calls a procedure that updates the progress note page to reflect the new changes.
The other thing you commonly want to do is remove a statement from part of the note. This can be done by clicking on
the "View All Statements" button in the Edit Algorithm dialog box. This will cause a window to appear with a Tk text widget
that has been programmed to list all the statements added by all the buttons for the progress note. You can add a command
to the current button you are configuring to remove any of these statements by double left clicking on any statement in
blue. This way you don't have to type out the statement for your button and they will be entered the same as the other button
added them which is necessary for the computer to match them.
You will see curly braces around the statements that are necessary to group the words so Tcl treats them as one item in the
list. Tcl will then
scan the list making up the part of the progress note and remove the item that matches the words you put between the curly
braces if they match
an item in the list. You can have a button do any other legal Tcl/Tk command, such as switching to a new page in the notebook,
but that is beyond the scope of our discussion.